Sunday, November 29, 2015

Colourful Square Water Decals - Born Pretty Store Review


*This product was sent to me for review, all opinions are my own

I'm back with another review of some water decals from Born Pretty Store! These decals caught my eye straight away because they were so colourful and geometric and I loved how they looked in the pictures. I was also curious to see how they transferred onto the nails because you had to cut them to fit instead of them being nail shaped already.

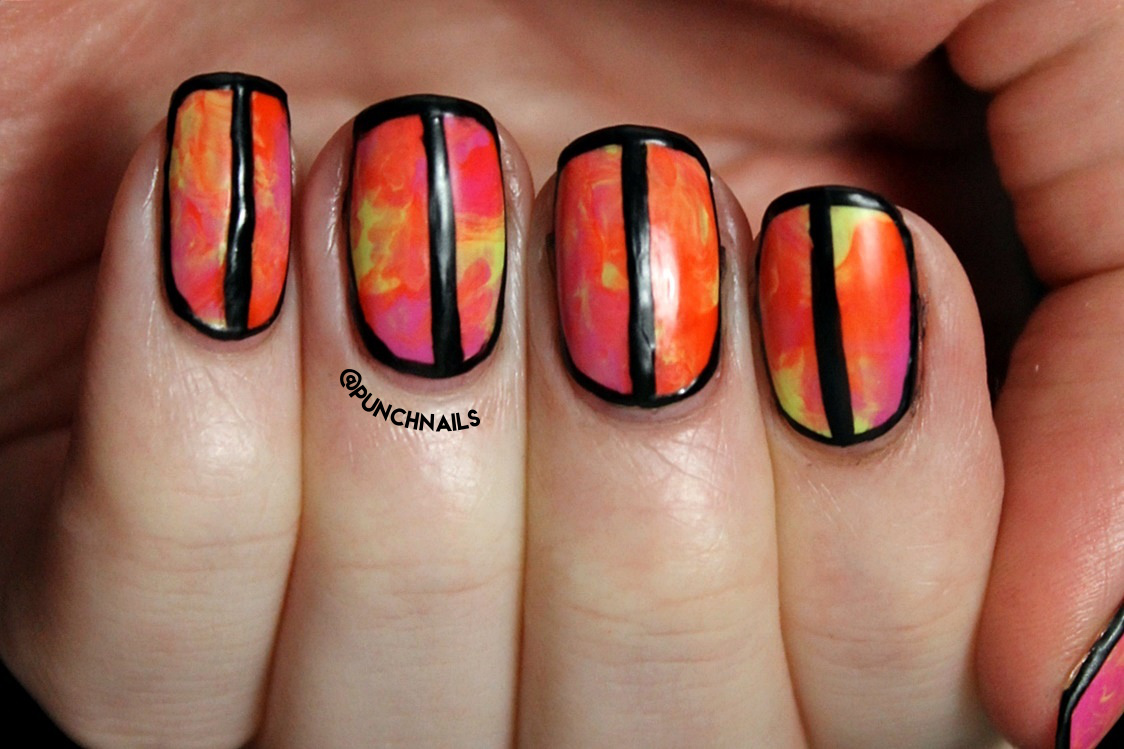
Turns out it wasn't that difficult! I cut the decal into rectangles that were about the width of my nail, I didn't worry about the length too much because I knew I'd just acetone to clean up the extra bits. But if you have short nails and want to get the most use out of decals like this then I would recommend cutting them to the length of your nail as well. You won't waste a lot that way.


It was really easy to clean up the excess decal around the cuticles and tip of the nail because the decals are thin. However I wish I had used a white base underneath because the colours weren't as solid or vibrant as they were on the paper backing.


I also had a few issues with lumps under the decals, I wasn't sure whether it was water or air or just the way I put them on but they didn't flatten out. I also wasn't too keen on some of the colour combination but that's mostly because I don't like the colours red or brown and they're the biggest squares on some of the decals.

So overall these aren't my favourite patterned decals but I do like that I could cut them how I wanted to, which made it easier to apply them and easier to shape them and clean up.

Don't forget you can use the code MEPUK31 for 10% off at checkout on their website!

- Melissa.

Sunday, November 22, 2015

Pink Gradient Chevrons

Today I have some simple gradient chevrons to share with you! I wanted to do something easy but something that still looked like it took a lot of effort. I don't think I've ever done a gradient chevron pattern, but I could be wrong!

For this design I used this brand of nail vinyls (the normal website is down for maintenance) and then sponged a few pink polishes over the top of them to make the gradient. I used Hot Spring by Ulta3, Secret Story by Essie, and Fairy Floss by Ulta3.


I really like how these turned out, I probably could have done another coat but I was worried that would cause the polish to drag too much when I pulled the nail vinyls off.

Anyway, that's it for today because it's only simple and there's not much else to them!

- Melissa.

Friday, November 20, 2015

Palm Tree Decals - Born Pretty Store Review

*This product was sent to me for review, all opinions are my own

The people at Born Pretty Store were kind enough to send me some of their nail art products to review, so first up are these summery water decals which I thought were really cute and easy to incorporate into nail art!

I chose the black decals because I already had a mani in mind when picking them. I've seen this design done by so many people that I always wanted to try it out but knew I'd never be able to hand paint the palm trees so when I saw these decals, I knew I had to get them.

To create my sunset base I used three polishes on a sponge to create a nice gradient. They were: Fierce N Tangy by Maybelline Color Show, In My Back Pocket by OPI, and OPI On Collins Ave by OPI. I then used those three colours on a small fan brush to blend the gradient together even more and to further even it out once I'd done that I used some acetone on the fan brush and lightly swept it across the nail to make it smooth and very blended. It turned out really well and I was very happy with it!


These were the set of decals I got, and as you can see there's a wide variety of designs to choose from but I went with the simple palm trees by themselves and the palm trees with the sun and grass. As usual, water decals are so simple to use as all you need to do is cut out the image you want, remove the plastic protector, dip the cut out in some water for 10-15 seconds and then gently remove the decal from the backing (if damp enough it'll simply slide off). Once that's done you can then carefully apply them to your nail using tweezers, flatten down, let it dry and then top coat it to protect it and help it last longer!


I added black polish to the middle and ring fingernails to help make it look like one picture as only the trees were the decal, whereas the index and pinky ones were all part of the decal and didn't need anything added to them.

I love how these turned out and I'm happy to have finally been able to do this design after loving all the ones I've seen over the years. It's one of my best gradients too.

Make sure you check out all the nail art products on the website and don't forget that I have a 10% off discount code to use when you buy anything from Born Pretty Store, the code is: MEPUK31.

Enjoy!

- Melissa.

Friday, November 13, 2015

Simple Splatter Nail Art

As you should all know by now, splatter nails are one of my favourite designs to do. Whenever I'm lacking in inspiration I always do some splatter nails to help out and I always feel happy with the outcome of them.

This time around though I did things a little differently. Instead of using straws like I always do I decided to use a bobby pin; specifically the bit where it curves at the end. Now I cannot for the life of me remember where I first saw this idea, but I know it was in a video and it was only mentioned in passing. I've tried searching Instagram and YouTube for where I think it might've come from but I can't find whatever video it was that I first heard it in so I don't know where this idea came from originally. 

But anyway! Using a bobby pin for splatter designs has it pros and cons. It definitely made the design much neater because it doesn't result in huge blobs ending up on part of the nail and kind of ruining the whole thing. But on the downside it took foreverrrr. Sometimes it worked, sometimes it didn't and a lot of the time I couldn't get the positioning right so it ended up on the paper and nowhere near my nails. In the end though it was worth it because it's such a simple design. There are no big blobs, all the colours can be seen and it looks awesome!


I used the following polishes: Sapphire Siren by Maybelline Color Show, Secret Story, and Shake Your $$ Maker, both by Essie.

I'm definitely going to be using this method for future splatter designs because I really do love the outcome of it!

Thanks for reading.

- Melissa.

Sunday, November 08, 2015

Swirled Nail Art w/ Black Accents

Recently I've been wanting to do borders around my nail art but haven't had the right design that I thought would look good with it. So the other day I did some swirled/marble nail art using cut up sandwich bags and thought it'd be perfect to do some black borders around it!

I used Orange Fix, Chic Chartreuse, and Fuchsia Petal all by Maybelline Color Show. I smooshed all of those colours together with cut up bits of a sandwich bag and I really love how it turned out! The green comes across as more of a yellow when mixed with the other colours, but that's okay.


I then went in with Black Satin by Ulta3 and carefully did some borders around each nail, and then thought it'd look even better with a line down the middle of the nail. Not sure which ended up better but I only took photos of the end result and everyone who saw my nails while I was wearing them absolutely loved them!


I think it looks really cool and makes it even more eye-catching! I topped it with Revlon's Matte Top Coat but it didn't make them completely matte, only dulled them down a bit so I think I might need a new matte top coat!

- Melissa.

Friday, November 06, 2015

Purple Pond Mani

Today's post will just be a quick one considering I did this mani for the blue prompt in the challenge in September, but had the urge to try it out in a different colour recently.

I used an OPI Sheer Tint again in the colour Don't Violet Me Down and I still really love this type of mani. I did less dots than last time so there's less definition than my previous one but it still looks super cool and 3D.


I really enjoy the look of this design because it's simple and still stands out. I think I did three or four layers on the sheer tint because I didn't want it to be too thick since I wanted to top coat it and wear it for a few days.

That's it for today! Thanks for reading.

- Melissa.

Tuesday, November 03, 2015

Simple Black & White Nail Art

Hi everybody! Today I'm posting about a nail art idea that I had stuck in my head for weeks and finally got around to doing it today. It's nothing special at all, and as I was doing it I realised it wasn't working out the way I wanted it to in my head. But it's simple and still looks like great nail art anyway.

I used Snow Me White by Sinful Colors and Black Satin by Ulta3 on a thin, medium length striping brush. After doing the lines I went back in with some of the white polish on a smaller striping brush just to clean up some of the black and neaten the lines up.


I think this would look pretty cool with a colourful sponged base and white for the stripes, or even a rainbow pattern for the stripes on a white base, the combos are pretty much endless.

That's it for today, thanks for reading!

- Melissa.